JPEG Compression
met this artist during SF Open Studios that had a very unique style of decomposing images into individual square blocks that are incomprehensible when standing close to the painting, but form figures as you step away. My friend mentioned that this effect reminded him of jpeg compression when using a very large compression block size.
I had heard of jpeg compression before (saving photoshop files to jpeg, etc), but was suddenly curious to find out how it works under the hood. After reading that the main process involves the discrete cosine transform, I had a flashback to my days at UCLA studying Fourier transforms and was instantly hooked.
I found some articles and video tutorials describing the process of discrete cosine transforms and quantization matrices, but the subject matter is pretty dense to get on the first go. I also have this thing where if something is interesting to me, I have an urge to understand every piece of down to the core.
So, the only option was to implement my own jpeg compressor, and maybe find some artistic value in the process.
The basic steps are as follows:
- Divide your image into n x n squares.
- Transform every n x n image block using the discrete cosine transform:

Friendly formula for sure.. Essentially all this formula is doing is transforming the image block from pixel intensity to frequency domain. In the frequency domain, we can keep the low frequencies and get rid of the high frequency data without sacrificing too much image quality.
<<< IF THE DCT GIVES YOU NIGHTMARES, PROCEED TO STEP 3 >>>
The image below helped me understand how the DCT was being applied to the image, for an example where n = 8. Think of each square as a set of weights specified by grayscale value ( top left is uniform ). Multiplying the first square by the entire 8 x 8 image block will give you the [0,0] value of our 8 x 8 block in the frequency domain. Multiplying the second square (first row) by the entire 8 x 8 image will give you the [0,1] value of our 8 x 8 block in the frequency domain. Ponder over this for a while and it will make sense that the most information is stored in the top left corner of our frequency domain block… or just admire the matrix.

3. The quantization step. This is the step where we are losing information by removing the high frequency components. I currently quantize the data by dividing each component by a uniform number, and discard the number if the result rounds to 0. There are more complex methods of quantization, such as dividing the top left data by smaller numbers because we know this is where the most information is stored. However, there is no absolute standard for choosing your quantization matrix. Some say it is sort of a black art, and this is definitely something I want to look into more in the future.
4. Dequantize by multiplying back the same coefficients from the quantization matrix, this is where you can see the loss of information as the values you rounded down to 0 in the last step are now gone :0
5. Apply the Inverse Discrete Cosine Transform to return to pixel intensity domain.
Applying these steps to every block in a large image requires quite a lot of operations -> lengthy runtimes. However, I found some ways to decrease computation time, such as precomputing DCT and IDCT coefficient matrices.
Anyways, if interested in the mathematics behind jpeg compression, I would highly recommend checking out my source code below. It has some pretty detailed comments that should help illustrate the process, and also allows the user to play around with the image block/quantization parameters (which is pretty fun).
source code:
https://github.com/sneha-belkhale/jpeg-compression-art
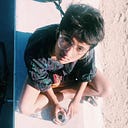
Orrrr… just enjoy some cool pics that I generated using some pretty lossy quantization values~